Mini Piñata Cakes

There's something about miniature cakes that is just so much sweeter! I've seen gorgeous giant rainbow piñata cakes but even one slice is too big for my boys. So why not try a mini version of the piñata classic.

Perfect for little ones to help with and a total surprise for your party guests.

pinata cake.jpg

One of my oldest friends from University just happened to be able to stop in on route to Cornwall for the weekend. I haven't seen her for over 3 years as, she and her husband have been living and working in Australia. 

So what do you do when you have a child asleep mid afternoon and you can't leave the house on a grey, drizzly day? 

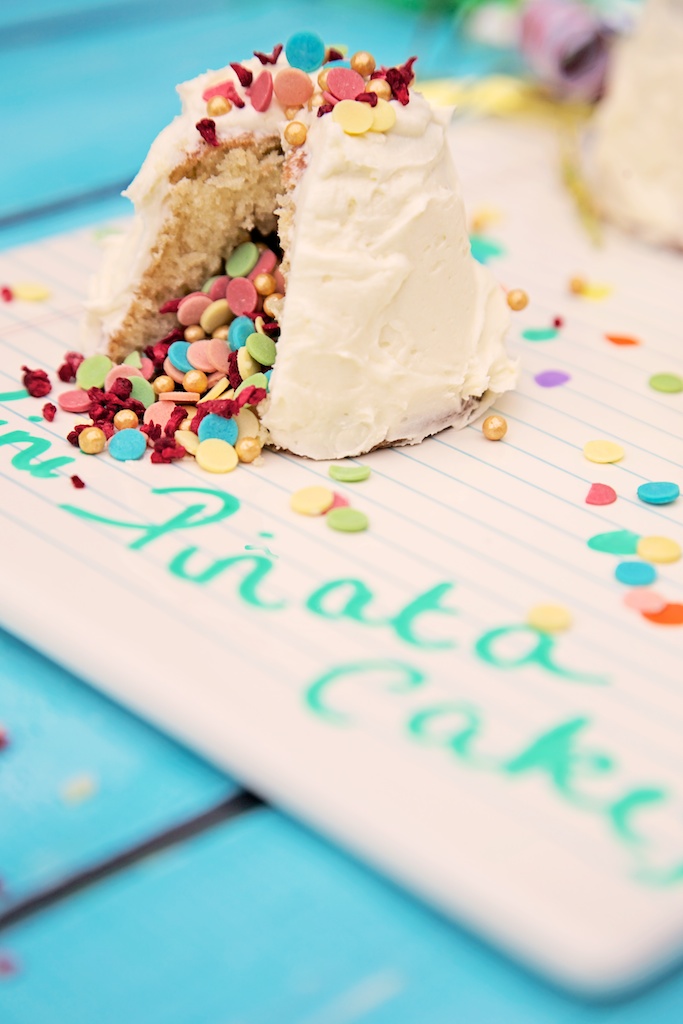
Bake a cake. Or rather, Mini Piñata Cakes! 

piñata cake.jpg

I have seen the large versions before but never small ones, eat in 3 mouthful ones. 

So we gave it a go. 

Ingredients (Makes 6 small cakes) : 

  • 65g/2oz butter
  • 65g/2oz caster sugar
  • 2 medium eggs
  • 65g/2oz sieved self raising flour
  • 2 drops rose water

piñata cake.jpg

Pre heat the oven to 180 degrees or Gas Mark 4. 

Add your butter and sugar to a large mixing bowl and whisk until the mixture forms a pale fluid consistency with no lumps! 

Add your eggs and whisk together. Add the sieved flour a little at a time. Sift your flour in from a height as this will get more air into your cake and make it light and fluffy. (I whisked the whole mix, but some recipes will tell you to fold in the flour.) 

Pour into moulds, I used the flower pot moulds I normally use in Sammy's Bento lunches, as they are nice and tall. 

Tap the moulds on the work top to remove any air bubbles. 

Tidy the tops with a piece of kitchen roll to remove any drips of mixture that could burn in the oven. 

Bake for 20 minutes. I checked on mine a couple of times and at 15 minutes placed a skewer (or rather a fondue fork) into the centre. If the skewer comes out clean they are ready. 

Leave to cool (in the moulds) on a wire rack for 10 minutes. 

When cool gently tease your cakes from the moulds. You can grease your moulds with kitchen paper and butter beforehand, to ease this process. 

Cut the uneven tops off and eat them!

Use a sharp serrated knife to carve out a hollow in the centre. You can get a nifty gadget called a cupcake corer, that does this for you.

The freshly cut top will form the flat base of your cake. 

piñata cake.jpg

Fill your hollow with sprinkles or sweets of your choice. 

Using a little of the hollowed out leftover cake replace the top and cover with edible paper or baking paper. This enables the cake to hold it's shape and contents! 

piñata cake.jpg

Ice with the following buttercream, as generously and rustic as you like! 

Ingredients: 

  • 140g/5oz butter
  • 280g/10oz icing sugar
  • 25ml white chocolate liqueur (optional but completely delicious)

Whisk the butter in a mixing bowl and start to add the icing sugar slowly. I used an electric whisk and the surface around you does get dusty! Queue lots of ghostly faces in our house! Start on a slow speed and work up. Add the liqueur half a little at a time to suit your taste. 

Use a knife to paddle the creamy icing around the cake, the more rustic the better. Remember piñatas are rough in texture! 

Sprinkle your finished cakes with some left over sprinkles. 


pinata cake.jpg

Perfect for parties or for little favours. 

pinata cake.jpg

The rose water adds a delicateness to the sponge and the crunchy sprinkles, mixed with some freeze dried raspberries adds texture and crunch.

pinata cake.jpg

Slice into your mini cakes and watch your surprise come tumbling out! 

pinata cake.jpg

Next time I might change the rose water to orange blossom and fill the inside with fruit! 

pinata cake.jpg

You can find this recipe on my Pinterest board so feel free to pin away!  

pinata cake recipe capture by lucy.jpg
Wonderful Wedding Wednesday • The Best Royal Weddings

I'm a sucker for a good wedding.  

Any wedding. Friends, family, Facebook friends. I so enjoy reading about a celebrity wedding (For the record Marvin and Rochelle from the Saturdays is my favourite celeb big day) or two and get lost for hours in wedding blogs and on Pinterest. 

Who else will admit to be more than a little bit tempted to renew their vows, just so you could plan your renewal on Pinterest?! 

I love a good Royal Wedding too. Oh the tiaras! 

These are some of my favourite Royal brides. Majestic, classic, trendsetting in their day and inspiring. I would take a detail from each one to create my ultimate Royal bridal look.

Best Royal Weddings.jpg

From left to right, top to bottom: Princess LouisePrincess Grace of MonacoPrincess Marie-Françoise Princess Margaret, The Duchess of CambridgeQueen Elizabeth II

I adored the build up to THE Royal Wedding of the last decade, we had a party (any excuse) and the house was decorated in red, white and blue! And this was pre blog, so you can see I have always had OTT tendencies! 

The Royal Wedding.jpg

I was pregnant with Ollie, in a deliriously happy stage of pregnancy, I had my sister to cry with as Kate entered the church and it was a wonderful family day.

I love how weddings bring out so much happiness in more than just the bride and groom. You see Facebook pictures of couples all dressed up for a friends wedding, mothers bursting with pride when their little ones are chosen as flower girls and that nervous excitement that sweeps the room before the bride makes her entrance is magic.

Every Wednesday I support The Wedding Wishing Well Foundation. Where the work they do is literally magic. 

Magic because it makes a couple's dreams come true. Before something really sad may happen.  They help terminally ill people plan and fund their weddings. Weddings, which would probably have not happened otherwise.

Please help make another couple as happy as Catherine and William, as happy as all the other Royal couples who will come after them, and most of all, as happy as I or you were on your wedding day.  

It doesn't matter who you are on your wedding day. It matters who you marry. And for the couples who are supported by The Wedding Wishing Well Foundation, it matters when you marry.

You can donate £1 or more if you'd like to, here

CharityLucy HeathComment
Cherry Floss Open Pie

Hello from sunny Southbourne!

Here is a little something I prepared earlier...

Open bakes are my go to idea when feeding a large number of people, with minimal effort. 

You can make them as large as you want and they always look impressive, when laid in the centre of the table.

My brother was given a candy floss maker for his birthday (he was 28!) and I love the stuff. Since we have been back from America, I have been desperate for a little bag of the fluffy wonder and was thrilled when I spotted it in the local supermarket. 

As we got home and I started unpacking the weekly shop, Sammy, who had brought in the bunch of flowers for the kitchen, held up a fox glove stem and said "Mama, this looks just like candy floss!" And this little idea was born. What could be better than sprinkling it's sugary over a baked delight?

open cherry floss pie.jpg

Cherry Floss Open Pie! 

open cherry floss pie.jpg

You could easily make this with cooked rhubarb, plums, strawberries, raspberries or blackberries.  Or do a summer mix up of them all!

Open Cherry Floss Pie.jpg

I find it much quicker and easier to use puff pastry as a flat baked pie rather than make a traditional pie.  Plus I like to see what's inside.

open cherry floss pie.jpg

Ingredients: 

  • 1 sheet puff pastry
  • 2 tins of pitted cherries or 500g fresh cherries, stones removed (I used a mix of both)
  • Sprinkle of caster sugar
  • Handful of chopped walnuts (optional)
  • Drizzle of vanilla syrup
  • 1 beaten egg to glaze the pastry edges 
  • 1 tub candy floss (Morrisons supermarket sell individual tubs for c£1) 
  • Dusting of icing sugar
  • Vanilla custard to serve
open cherry floss pie.jpg

Pre heat your oven to 180 degrees or Gas Mark 4.

Lay your sheet of puff pastry on a baking tray and gently roll the edges inwards to create an approximately 1cm lip to contain your filling.

Arrange your fruit filling in rows and sprinkle with caster sugar and the chopped walnuts. Drizzle the vanilla syrup over the entire mix. 

Heat in the oven for around 15 minutes until the tops of the cherries are caramelised. Make sure you don't burn the walnuts! 

Gently rip your candy floss into bit size pieces and place them randomly on the top of your flat pie. Watch them sizzle into the hot mixture to create pockets of sticky goodness.

Dust with icing sugar and serve with vanilla custard. Enjoy immediately. 

open cherry floss pie.jpg

Sammy loved that as the candy floss sizzles into the cherries it looks like spider's webs. Very cool to small boys. 

open cherry floss pie.jpg

Watch out next week for my savoury idea and pick up a roll of puff pastry and stick it in the freezer. 

open cherry floss pie.jpg

An easy summer dessert idea, to use up your seasonal fruit.  Plus cherries need no pre cooking as opposed to rhubarb - time saving, I like it!

bowl of cherries.jpg

It's also so easy to change the fruit for a more Autumnal idea as the weather changes. 

open cherry floss pie.jpg