Me and Mine - A Family Portrait January 14

Happy New Year Me and Miners!

Today marks a milestone.

A whole month of being out of our house without a new one to go to. We have settled in as much as I think we are going to, to our rented house, as we have run out of space to unpack any more boxes! 

It's also been a whole month of refreshing Rightmove and Zoopla 10 times a day. Why can't there be one update a day?! It's driving us mad, houses popping up at all sorts of random times.

In a month we have viewed a total number of zero properties. I got excited about a couple, only to discover there was no garden at the back of one ever to extend, and the other backed onto a river. With all the terrible flooding in this part of the world, we won't be heading to a river side location any time soon.

But we have a lovely landlord willing to extend our rental period month by month, so instead of counting down, feeling under pressure to have found and offered on something by the end of next month, (to give us any hope of completing before the end of our tenancy) I've decided to try and go with the flow. Even if that is tricky, as we drive past our old house every day.

We've made a lovely home here. Yes the pink artex isn't one of the top interior design qualities I look for in a home, but we have lots of space and our furniture just somehow seems to fit all the funny nooks and crannies. We keep saying, if you got your hands on this and made a few changes, you could completely transform it.

I have uploaded a little video home tour. (it's quite long so feel free to fast forward. Plus what is it with your voice on video?!) 

So this has been life lately.

Capture by Lucy

No alcohol until Ollie had a second trip to A&E in almost as many days, then a bout of chicken pox which has covered his little body in ghastly red sores. It's been a couple of weeks of iPad entertainment, Rich and I juggling work and colds, with a couple of lovely parties, cups of tea with best friends and Skypes with my little niece. Rich and I have lost 23 lbs between us and I'm determined to lose another stone, to fit into a favourite dress for Yasmin's Christening at the end of April.

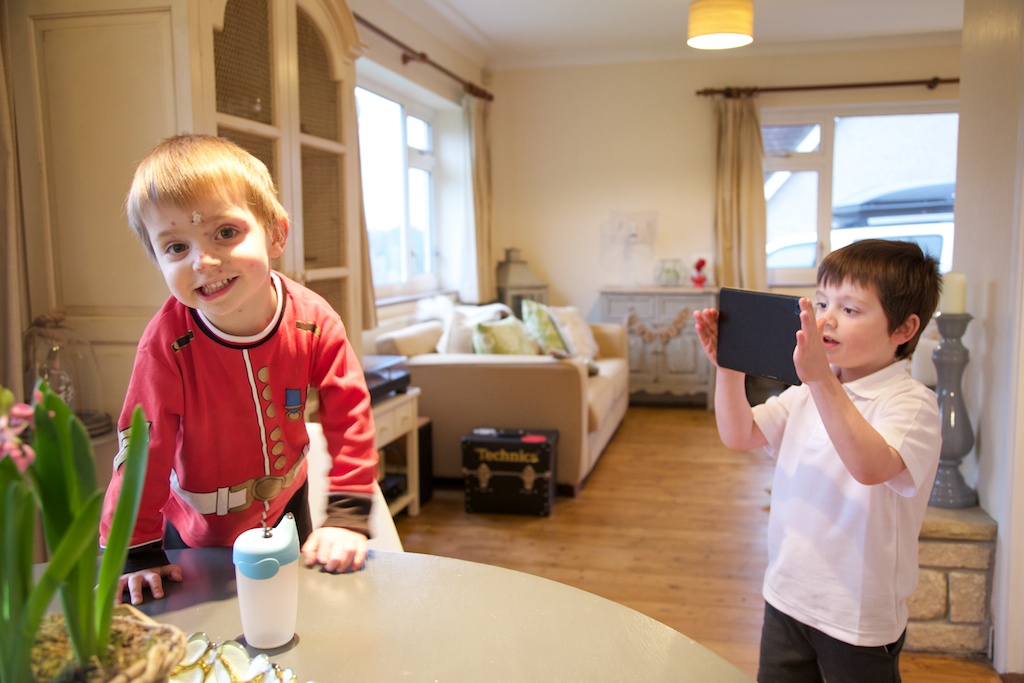
This is Ollie saying cheese - looking at me and not Sammy who was playing photographer!

I've been pouring over home magazines and saving scrap bits of paper for inspiration when our perfect house pops up on the market, whilst sat on the laptop with my best friend scrolling through endless house listings. The house is covered in half finished blog posts and the dog food bin has become a handy table in the back porch for taking food photos! It give me a really nice soft natural light :)

We have 2 sleepovers this week. One at my sister's, just for me and then we are hosting a little sleepover for Sammy's sweetheart, with a first trip to a bowling alley and a birthday lunch after.

I am working away next week, snapping a special project and have been invited to this gallery exhibition next Wednesday evening, with the photographer himself presenting his iconic pieces of work. I am giddy.

Today I am up in Bristol getting a little Valentine's love on with a photo shoot with The Little Wedding Helper. A few hours of playing with flowers and hearts, yes please! 

And in amongst all this month's chaos and drama, this was the only photo of the four of us. From the first night we moved in. A perfect one to share for the new start of Me and Mine 2014.

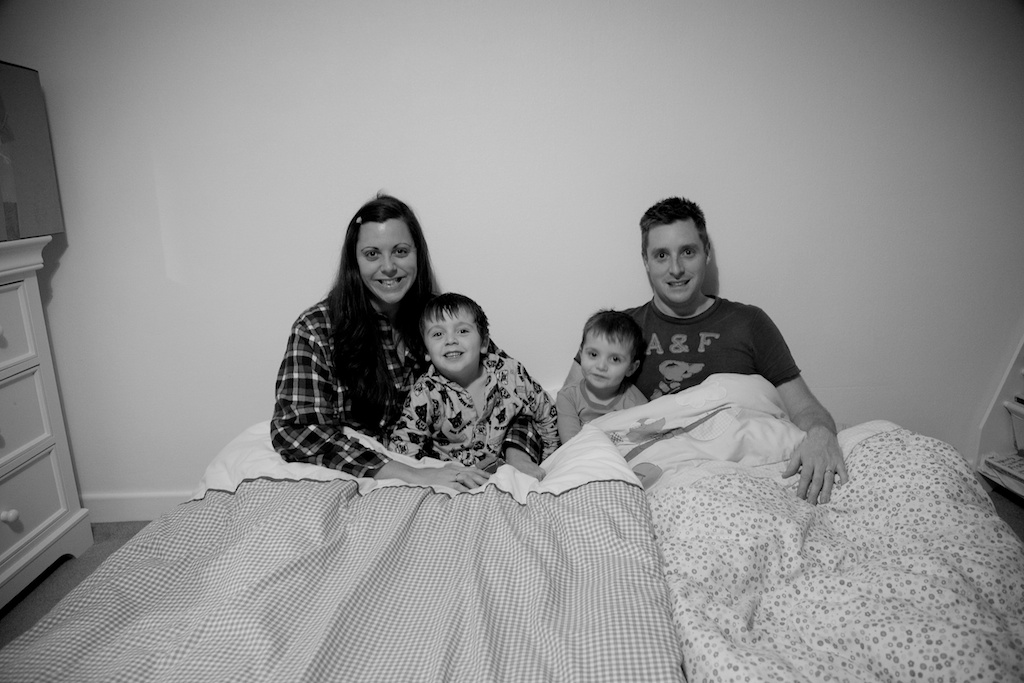
I hoped the black and white might hide just how tired I look in this photo!

Isn't this just how the first night in a new home is meant to look? Beds on floors?! 

February is jam packed for us, Rich's birthday, parties, days out, a family gathering, I'm hoping we will be spoilt for choice for our February photo.

Join in with us and capture a moment in your family lives, once a month.

I've shown you Me and Mine, now show me you and yours!

Head over to Katie's blog to catch up with her family adventures this month. Her blog is genuine, heartfelt and full of happiness. I love it. 

dear beautiful

ps. I'd like to apologise for not commenting on all the lovely photos linked up last month. I felt I didn't have time to breathe last month, but that's all changed. I can't wait to read all your posts.

DIY Glitter Cutlery

This is grown up glitter play.

Forget the children - these are beautiful to play with and for adding a little sparkle to your dinner table or party buffet.

Take one plain set of mis matched cutlery and...

vintage cutlery

I picked up a collection of cutlery at my local charity shop for 10p a piece and 3 hallmarked  silver serving spoons for £1.50 each.

I raided my craft supplies and found a half empty pot of gold glitter and grabbed a clear nail varnish from the bathroom cabinet.

DIY Glitter Cutlery

There are lots of DIY tutorials on the internet for adding glitter to wooden spoons using the US product modge podge but in the absence of that magic glue, I found nail polish was perfect and creating a smooth, shiny finish.

It leaves a hard surface on the gilder meaning that there's no dreaded dust once dry.

Glitter Cutlery Tutorial
Glitter Cutlery

Step 1
Over a piece of paper paint a think layer of nail varnish onto the area you want to glitter. 

Step 2
Using a spoon, generously sprinkle your wet area with glitter. Tap to shake off the excess. Leave to dry.

Take a cotton bud and wipe the excess for a smooth finish before step 3.

Step 3
Repeat step 1 over the glittered area and leave to dry.

When finished simply curl the long edges of your piece of paper towards each other and funnel the excess glitter back into the container for another day.

DIY Glitter Cutlery
Gold Glitter
Glitter Cutlery
Glitter Cutlery

Nail varnish will withstand washing, but not forever. So very now and again give them a revarnish.

DIY Glitter Cutlery.jpg

You could try bright coloured glitter for a Spring feel or coordinate your glitter to your party theme.

DIY Glitter Cutlery

I am going to make some more servers for my niece Yasmin's Flamingo First Birthday Party! I wonder how many shades of pink glitter there are!

DIY Glitter Tutorial

Linking up with Sunday Best Showcase & #MagpieMonday

Seafood Macaroni Muffins

There were 2 things that inspired this dish.

Firstly, my new ceramic muffin tray that I couldn't resist and this recipe by one of my favourite blogs. Macaroni cheese is one of my Mum's signature dishes. It's what we always ate as children when we felt poorly or needed comforting. So when she came to stay a couple of weeks ago I wrote down her recipe and gave it a new twist with the seafood and comical crackers.

I wanted to make something we could all share for a Valentine's tea, as we will have had a fancy (albeit) home cooked meal, the night before for Richard's birthday, I wanted something simple but satisfying. After all the boys are the loves of my life!

A good way to sneak seafood into fussy eaters too.

Here is what you need:

Seafood Macaroni Ingredients

Makes 12 muffins.

  • 250g/8oz/2 cups macaroni 
  • 50g/1.75oz/0.6 cup butter
  • 2 chopped spring onions
  • 2 heaped tablespoons cornflour
  • 275ml/10oz/1.2 cups milk
  • 125g/4oz/1 cup grated mature cheddar cheese
  • generous pinch of chives (fresh or dried)
  • generous pinch of paprika
  • fresh, peeled prawns/shrimp - I allowed 2 per muffin
  • 1 tin pink salmon
  • 1 smoked mackerel fillet, flaked with a fork
  • handful cheese crackers - I love the fish and heart shaped ones!
  • chopped fresh dill 
Seafood Macaroni

Preheat your oven to 180 degrees/350F/Gas Mark 4.

In a saucepan cook the macaroni according to the instructions. Cook until tender but not squishy. Drain and set aside, so all the water drains away.

In a large saucepan melt your butter on a low heat and add the chopped spring onions to soften.

In a jug mix your cornflour with 50ml/0.2 cups of milk. Stir vigorously until all the cornflour has dissolved. Add the remainder of your milk.

Take your butter and onions off the heat and stir in your jug of milk. Again off the heat add your grated cheese. Return to a medium heat and stir continuously for around 5-8 minutes until you have a smooth cheese sauce. If you find your sauce a little thin add a level teaspoon of cornflour (again dissolved in a splash of milk) to your sauce to thicken.

Add your chives and paprika and season.

Take your sauce off the heat and add your drained pasta. 

Layer your muffin tray with a spoonful of the macaroni mix, a layer of flaked salmon, prawns/shrimp and flaked mackerel and top with another spoonful of macaroni.

Submerge 3/4 crackers per muffin and sprinkle with chopped dill.

Bake in the oven for 25 minutes, until the tops are golden brown and bubbling. Leave to stand for a couple of minutes before serving.

Seafood macaroni recipe

Creamy and delicious, with texture and flavour, and it got the boys eating 3 types of fish in one.

Bonus!

Seafood Macaroni Cheese
Seafood Macaroni Muffins5.jpg
Seafood Macaroni Cheese
Seafood Macaroni Cheese Recipe

Where do you get your inspiration from for recipe ideas? I have just discovered this blog. Wow. 

Find more inspiration over on #TastyTuesdays and #recipeoftheweek